A projector changes more than the size of a picture. It changes where you sit, how you use the light in a room and which surface becomes the center of the evening. A little planning makes those changes feel natural. Start with the room you already have, choose a sensible screen size and get one reliable source playing before adding anything else.
This guide is for a first home setup or an occasional movie night outside. It explains the decisions in the order you are likely to make them. Follow the manual supplied with your exact model whenever it gives a specific requirement for power, mounting, distance or ventilation. Our model comparison can help you narrow down the projector before you begin.
1. Start with the room, especially the light.
Visit your planned viewing spot at the time you actually expect to watch. A room that feels comfortably dim in the afternoon can look different with an overhead light on, a hallway door open or streetlights shining through a window. Notice the light that falls directly on the screen surface. That light is usually more distracting than a small lamp behind your seat.
Try the simplest changes first. Close the curtains, move a lamp away from the screen and turn off lights you do not need. Keep enough gentle light for people to move safely. You do not have to turn the entire home into a dedicated theater, but controlling the light gives a projected picture a better starting point.
Then look at the surface. A plain, smooth, neutral wall can be useful for testing placement. Texture, a strong paint color or a glossy finish may become visible in the picture. A suitable projection screen gives you a more deliberate surface, but it still needs to be positioned well. Do a temporary test before deciding where a permanent screen should go.
Think about the rest of the room at the same time. Will someone walk through the light path? Does the projector block a door, cupboard or comfortable seat? Can a cable reach without crossing the main walkway? It is easier to change a temporary table position now than to discover a daily inconvenience after mounting the projector.
Put the projector on a stable surface, dim the room and play a familiar scene at a moderate picture size. Check the view from every seat you expect to use. A smaller, comfortably placed picture is often a better starting point than the largest image the wall can hold.
2. Choose a screen size you can comfortably use.
Screen sizes are usually given as the diagonal measurement, from one corner of the picture to the opposite corner. That number does not tell you the wall width on its own. For a 16:9 image, a 100-inch diagonal is about 87 inches wide and 49 inches high. Check both dimensions against the usable wall area, including any furniture below it.
Mark a rough outline with a removable method appropriate for your wall, or use a temporary projected test image. Sit where you would normally watch. Look at the top and bottom of the proposed picture without changing your posture. If you have to tilt your head for a long time, lower the picture or reduce its size before considering a different seat.
Your content matters too. A film watched from a sofa is different from a game with small on-screen text or a presentation viewed from the back of a room. Test the kind of material you use most. Check subtitles and menu text as well as the main image. A dramatic opening scene can look impressive while a small caption still feels difficult to read.
Remember that a larger picture spreads the projector’s light over a larger area. In a room with some ambient light, reducing the image size may produce a more satisfying result. There is no need to choose the largest size first and spend the rest of the evening trying to compensate for it.
Understand native resolution and input support.
The selected iSinbox models in this catalog have a native resolution of 1920 × 1080 pixels. Their support for 4K input or decoding means they can process supported higher-resolution content and show it at the projector’s native resolution. Those are different specifications, and both are useful when you are comparing products.
For setup, begin with a compatible source and a clear, stable signal. If text looks poor, check the source’s output settings before assuming the projector needs more focus adjustment. A low-quality stream, an unstable wireless connection or an incorrectly configured source can affect the picture before it reaches the lens.
3. Position the projector before adjusting the picture.
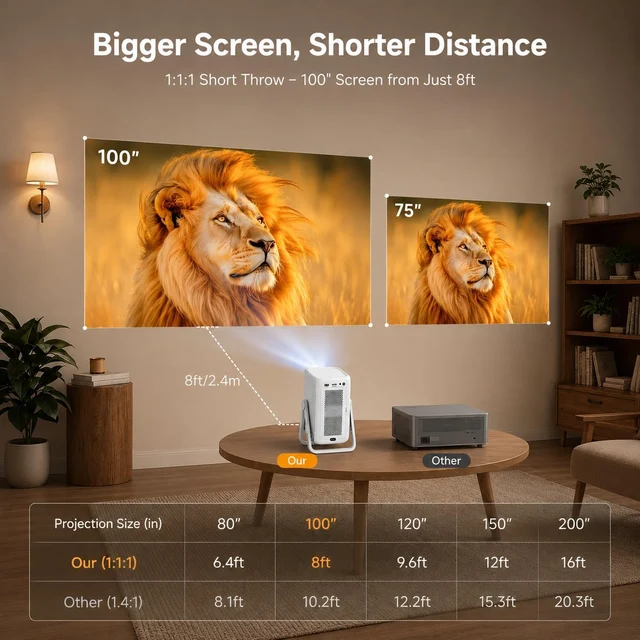
Throw distance is the distance from the projector’s lens to the screen. A throw ratio describes the relationship between that distance and the width of the projected image. It uses image width, not diagonal size. This distinction matters when you are checking whether a projector fits on an existing shelf or coffee table.
Our AC311 has a specified 1.1:1 throw ratio. For a 100-inch 16:9 picture, the resulting lens-to-screen distance is approximately eight feet. The selected product describes this as about 7.9 feet. Treat either figure as a planning estimate and test the actual setup before fixing a mount or ordering furniture around it.
Do not measure from the wall behind the projector or the back of the body. Find the lens position and allow additional space for the projector itself, power and signal cables, and the ventilation clearance required by its manual. A shelf can have the right distance and still be too shallow for a safe, comfortable installation.
Use the AC311 room-fit calculator to explore approximate distances for different screen sizes. It applies to that model’s specified ratio. Do not use it as a distance chart for a different projector simply because the case or model family looks similar.
Planning a smaller room?
AC311 combines a 1.1:1 short-throw lens with a dual-mode stand.
Get the physical alignment close first.
Place the projector on a stable, level surface and aim the lens toward the center of the screen. Adjust the stand or placement so the picture is as square as practical. Only then use autofocus, keystone correction or digital zoom to refine the result. This gives automatic adjustment a sensible starting point.
Keystone correction changes the image digitally to compensate for an angle. It is helpful when perfect physical placement is not possible, but heavy correction can reduce the useful image area and affect the appearance of fine detail. If one edge still looks soft, try moving the projector closer to a square-on position before increasing correction.
A rotating stand is useful for changing the projection angle, especially when switching between a wall and ceiling. It does not remove the need for a stable base or clear airflow. Check that the stand sits securely through the full position you intend to use and that attached cables do not pull against it.
If you plan to ceiling-mount a model, check its mounting requirements and the bracket’s compatibility carefully. The mounting surface, fasteners and load capacity all matter. Follow the equipment instructions and use a qualified installer when you are unsure. A screw hole alone is not proof that any universal bracket will fit safely.
4. Connect one content source and make it reliable.
Choose the simplest source for your first evening. That might be a supported built-in app, an HDMI streaming device, a laptop or another compatible player. Get that one source working all the way through a short program before experimenting with every connection option. A successful menu screen does not always prove that the full video and audio path is ready.
For an app, check network access, sign-in and any subscription requirements in advance. Your own service accounts and subscriptions are not included with the projector. Available apps and individual features may change with region or software version, so check the exact service you plan to use instead of relying on a familiar logo alone.
For an HDMI source, use a suitable cable and select the corresponding input. If there is no picture, confirm that the source is awake and sending a supported output format. Change one thing at a time: first the input selection, then the connection, then the source setting. This makes it easier to identify which adjustment actually solved the problem.
Phone mirroring can be convenient for compatible content, but it is not a universal substitute for a streaming app or a wired source. Some services restrict mirrored playback. If a menu or photo appears but a movie does not, try the supported app or a compatible HDMI device instead of repeatedly changing the projector’s focus or brightness.
Check the network where the projector will be.
A strong connection next to your router does not establish that the planned viewing spot has the same reception. Play a longer sample from the projector’s actual position. If playback pauses, compare another program or source and check whether other devices are using the connection heavily. Keep the initial test simple enough to separate network behavior from image settings.
Install available updates using the method in the projector’s instructions and allow time for the process to finish. Do not make an unfamiliar update your first step with guests already waiting. Once your chosen source works, note the input or app you used so you can return to it without rebuilding the setup next time.
Building a setup that stays put?
JY821 offers two HDMI inputs, two USB ports and LAN for your connected sources.
5. Set the sound from the seats, not the menu.
Start with the projector’s built-in speakers and a familiar scene containing both dialogue and music. Sit where you plan to watch and set a comfortable volume. The sound that seems loud at the table can feel different at the far end of the sofa, especially in an open room or outdoors.
Listen for the voices first. If dialogue is difficult to follow, check the available audio mode and the source’s output settings. Do not assume that increasing the master volume is the only solution. The selected YG381 180° includes Voice Boost; other models have their own audio features, so use the controls documented for the unit in front of you.
If you connect headphones, speakers or a soundbar, check compatibility at both ends. Bluetooth is convenient for suitable audio equipment, while supported HDMI audio-return features can be useful for a compatible sound system. The name on one device is only part of the setup; the other device, port and cable must support the required connection too.
Watch a scene with visible speech after pairing wireless audio. If the timing feels wrong, explore the available audio synchronization settings or try a supported wired connection. Avoid making a large collection of adjustments at once. Keep a short note of the setting that worked so you can reproduce it after moving the projector.
Consider people outside the viewing area. Lower frequencies and outdoor sound can travel farther than you expect. Set the volume for the people watching, keep it comfortable, and choose a finish time appropriate for your surroundings. A smaller seating area can be more enjoyable than trying to fill an entire yard with sound.
6. Plan an outdoor movie as a temporary setup.
For outdoor viewing, start with a dry evening after sunset. Find a stable surface and a screen position that avoids unnecessary light. Check the forecast and have a straightforward plan to bring the equipment inside. Outdoor-use examples do not mean the projector has weather resistance, and a portable design does not mean it has an internal battery.
All selected models on this site need external power. Plan the power route before arranging the chairs. Use appropriate equipment according to its instructions, keep electrical connections dry and do not run cables where people will trip over them. If you cannot provide a suitable power setup, change the viewing location.
Test your network outdoors before the evening starts. Walls, distance and the projector’s position can affect the connection. A streaming service that plays reliably indoors may behave differently on the patio. Choose a source arrangement that you have actually checked in place, including its audio connection and remote operation.
A portable screen needs to stay secure. Follow its setup instructions and consider wind rather than treating a calm moment as a guarantee for the whole evening. Keep the projector, its stand and the seating layout clear of the screen’s supports. Avoid an arrangement where adjusting a chair means stepping over a tensioned line or a power cable.
Make the picture visible from the seats before finalizing the layout. People at the sides may have a different view from someone directly in front. Test a scene with dark areas and subtitles, then adjust seating or image size while there is still time. Comfort and a clear view matter more than a perfectly symmetrical row of chairs.
When the film ends, follow the projector’s shutdown and cooling instructions. Bring the equipment into a suitable indoor space and avoid packing warm equipment tightly before it is ready. Check for moisture and keep the lens protected during transport. Treat outdoor movie night as a temporary use, rather than leaving the setup outside between viewings.
7. Run a short check before everyone arrives.
Work through the same order each time. A repeatable routine is more useful than a long list of settings you only understand once. Start with placement and power, then check the source, picture and audio. Finish from a viewing seat so your final decision reflects the experience of the people watching.
- Space: the projector is stable, the light path is clear and the vents have the clearance required by the manual.
- Picture: the image fits the surface, the corners look reasonable and subtitles are readable from your seat.
- Source: the intended program plays, the correct account is signed in and the connection stays stable.
- Sound: dialogue is clear at a comfortable level and external audio stays in sync.
- Controls: the remote works from the seats and the batteries are ready. Check whether your model includes them.
- Route: people can get in and out without crossing a beam, moving the projector or stepping over loose cables.
Keep a small light available for a pause, a snack or someone leaving the room. Put the remote where it is easy to find without reaching across the projector. These are small choices, but they prevent a good setup from becoming awkward once the movie starts.
8. Keep the next movie night easy.
After the first successful setup, record the useful details: projector position, approximate screen size, selected input, audio connection and any adjustment you needed. You do not need a technical log. A short note helps when the projector moves to another room or someone else wants to use it.
Follow the manual’s cleaning instructions and avoid touching the lens unnecessarily. Keep ventilation openings clear and protect the unit from dust and moisture when stored. Do not open the case to investigate a picture issue. Start with the basic checks, then contact the support route associated with your exact model and purchase.
If something changes, describe the symptom clearly. Does it affect one app or every input? Did it begin after moving the projector, changing a cable or adjusting a source? A concise explanation, the model number and a photo of the setup can be more helpful than a long list of settings changed at random.
For order questions, use the account where the purchase was made and select the relevant order. For product guidance, consult the manual and its supplied support details. Our help page and contact guidance explain how to prepare the information you will need.
Once the picture, source and sound work together, leave the setup alone long enough to enjoy it. The best next step is often a comfortable seat, a familiar film and a little time to watch.